Showing posts with label Cake pops. Show all posts

Thursday, October 29, 2009

Cake Pop Tutorial

I have yet to meet a person that doesn't love cake pops. The idea came from one of my fav baking divas Bakerella, but I was introduced to them last year by my friends over at cafe mom. The creative possibilities with these little treats are endless as are the flavor combinations. Check out some variations here. Are they not the cutest things ever? Since I am not the creator of cake pops, I will direct you to Bakerella's original cake pop post as well as this great you tube vid that one of the ladies from cafe mom made for refrence. But here's my process.

Crumble cake into a food processor. It is possible to break it up with a cake if tou don't have a food processor, but it must be completely crumbled.


It should look like this once you're finished.


Next, add your icing. Start with a small amount, because if the mixture gets too moist, your cake pops will not stay on their sticks later. If you are using prepared frosting, be sure to get whipped. I usually use homemade frosting for my cake pops, but I needed it all for the cake, so I used the next best thing. Betty Crocker!


Mix until the frosting is fully incorporated and the mixture just comes together.


Line a cookie sheet with parchment and roll mixture into 1- 1 1/2 in. balls. Be careful not to make them too big.


I added sprinkles to half of mine for textire. Just sprinkle them right in.


Place your cake balls into the freezer for about 15 min to firm them up. Once you remove them from the freezer, it's time to place the lillipop sticks. Dip the end of the stick into your chocolate/candy and insert into your cake balls. This helps to anchor the sticks.


Now the fun begins. Dip your cake pops into your candy/chocolate and decorate. If you want to add sprinkles, do it immediately. To add designs or multiple colors, let cool for a few minutes before decorating.


Place in a styrofoam block to dry.


Enjoy! They are really good frozen too. They will last for up to a week in the fridge, but I guarantee you they won't be around that long.

Kaylee's First Birthday Rainbow Cake and Cake Pops


Miss KK turned 1 yesterday. It's hard to believe that it's been a year already. To celebrate the occasion, I decided I would make her a Rainbow Cake. The cake was really fun to make, time consuming but fun. I used Betty Crocker Boxed White Cake and Homemade Cream Cheese Icing. Since this was to be her smash cake, I used a 6 in round cake pan and for the top layer I a 1cup ceramic bowl that was the perfect size for a cute little topper.


I dyed the batter using both Wilton Gel colors and some Liquid Food color. I didn't do my research beforehand and bought liquid dye to use for this cake, but when I realized the difference in the vibrancy of the colors, I used the few Wilton gel colors I had on hand. Gel color gives the batter a much more vibrant color than the liquid (notice the difference between the green vs the red). The liquid color will produce a more pastel looking rainbow which is not what I wanted.
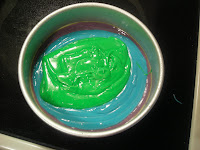
I layered the first 3 colors in the 6 in pan.
All 6 colors in the pan. It's so pretty. I was really proud of myself at this point.

Okay, here's where mistake #1 happened. Can you spot it? As I mentioned before, I am really an inexperienced baker. That coupled with the fact that I haven't made a cake in a while contributed to me forgetting that I needed to allow space in the pan for the cakes to rise. So needless to say, I had a slight catastrophe. As I look at this photo, I can't help but think WTH was I thinking filling the pans that much.
All baked! See how pretty. Unfortunatlaely, all of my purple boiled over out of the top layer, that's it sitting in the background. And I also lost quite a bit of cake from the bottom layer, but I'm actually excited about it because I know just what to do with the extra cake. But first lets ohh and ahh over the pretty cake.
The top layer. Can you see that one speck of indigo in the very center? LOL What a trooper.

6 in bottom layer. I was concerned with how dark the red would turn out, and thankfully it's not at all dull. You also can't see much indigo in this layer either. Oh well.
And here it is all fancied up. I know my decorating needs major help, but hey I'm new to this.

And remember the leftover scraps? Well I turned them into this!
Rainbow cake pops! I wrote Happy 1st B-Day Kaylee on 4 of them and stuck them into the sides of cake since there really wasn't much room on the actual cake for writing. Here's the finished product.
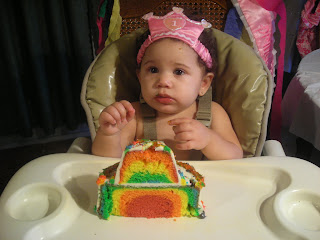
The Birthday girl enjoyed her cake.